Job Scheduling on AWS - Part 2 - Extending on premise job scheduler to AWS
This blog is the second in the series on Job scheduling in AWS. The first one focused on scheduling jobs using AWS native services. This blog focuses on an architecture to extend the on premise job scheduler to AWS.
(Link to the first blog - https://ideasforcloud.blogspot.com/2021/06/job-scheduling-on-aws.html)
A common requirement when you have Hybrid infrastructure (On premise data center + AWS Cloud), is to have a single job scheduler to schedule jobs on both the on premise and AWS Cloud environments. (Note - As I had indicated in the Part 1 blog, if your requirement is to source the data from an on premise data source, AWS Data Pipeline offers capabilities which helps you do that. You can install an AWS Data Pipeline Task Runner on your on premise server that can help manage your on premise data source).
Here are the steps you can follow to use your on premise scheduler to schedule jobs on AWS. I have outlined the steps for setting this on 1 AZ. However depending on your DR and HA needs, you can make this multi-AZ.
Step 1 – Choose an instance type as per the job scheduler tool requirement and install your job scheduler agent on your Amazon EC2. Install all required software’s and update on that Amazon EC2. Create an AMI.
Step 2 –
(Optional) – Create an Amazon RDS instance which will be used to hold the
scheduler metadata. If you already have one on premise and if that is
sufficient, you can skip this step.
Step 3 – Create
your Amazon EC2 Auto Scaling Group with MIN=MAX=1. This parameter ensures that
you will 1 EC2 instance always available.
Step 4 – Create
an ‘Internal facing’ AWS Application load balancer (OSI Layer 7). This load
balancer is internal facing and will not have access to internet. In addition,
this load balancer provides a DNS name that can be used instead of the Amazon
EC2 private IP. This ensures that your on premise job scheduler controller can
connect to the agent via this DNS name and does not have to worry about changes
to the Amazon EC2 private IP, if your Amazon EC2 terminates or a new one is
created.
Note – Another way
to maintain a constant IP will be to create an Elastic IP. However, Elastic IP
is Public, and organization security policies do not recommend Public IP
addresses unless really required. This is the reason I have chosen an internal
facing load balancer here.
Step 5 – Open the
appropriate AWS Security Groups to open a communication channel between your on
premise controller and the agent on EC2.
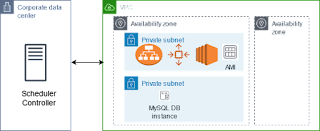
Putting this
all together –
As you were doing
with your on premise job scheduler, you can continue to schedule jobs on the on
premise controller. For scheduling and managing jobs on AWS, the on premise Job
scheduler controller will connect and coordinate with the agent on the Amazon
EC2. The agent will report the job run status back to the controller. If the
Amazon EC2 fails or terminates, the Auto Scaling parameter ensures that a new
Amazon EC2 is brought up using the AMI provided. The optional Amazon RDS
ensures that any metadata that is needed by the scheduler is available when the
new Amazon EC2 is ready.
~ Narendra V Joshi

Comments
Post a Comment